Getting started with Spark
Just got affiliate link (8%) from the publisher for my Spark in Action book. 50% off code: mlbonaci
spark-in-action.html
pic.twitter.com/JBE8vldPZc
— Marko Bonaci (@markobonaci)
April 8, 2015
This tutorial was written in October 2013.
At the time, the current development version of Spark was 0.9.0.
The tutorial covers Spark setup on Ubuntu 12.04:
- installation of all Spark prerequisites
- Spark build and installation
- basic Spark configuration
- standalone cluster setup (one master and 4 slaves on a single machine)
- running the
math.PIapproximation job on a standalone cluster
My setup
Before installing Spark:
- Ubuntu 12.04 LTS 32-bit
- OpenJDK 1.6.0_27
- Scala 2.9.3
- Maven 3.0.4
- Python 2.7.3 (you already have this)
- Git 1.7.9.5 (and this, I presume)
The official one-liner describes Spark as "a general purpose cluster computing platform".
Spark was conceived and developed at Berkeley labs. It is currently incubated at Apache and improved and maintained by a rapidly growing community of users, thus it's expected to graduate to top-level project very soon.
It's written mainly in Scala, and provides Scala, Java and Python APIs.
Scala API provides a way to write concise, higher level routines that effectively manipulate distributed data.
Here's a quick example of how straightforward it is to distribute some arbitrary data with Scala API:
// parallelized collection example
// example used Scala interpreter (also called 'repl') as an interface to Spark

// declare scala array:
scala> val data = Array(1, 2, 3, 4, 5)

// Scala interpreter responds with:
data: Array[Int] = Array(1, 2, 3, 4, 5)

// distribute the array in a cluster:
scala> val distData = sc.parallelize(data)

// sc is an instance of SparkCluster that's initialized for you by Scala repl

// returns Resilient Distributed Dataset:
distData: spark.RDD[Int] = spark.ParallelCollection@88eebe8e  // repl output
What the hell is RDD?
Resilient Distributed Dataset is a collection that has been distributed all over the Spark cluster. RDDs' main purpose is to support higher-level, parallel operations on data in a straightforward manner.
There are currently two types of RDDs: parallelized collections, which take an existing Scala collection and run operations on it in parallel, and Hadoop datasets, which run functions on each record of a file in HDFS (or any other storage system supported by Hadoop).
Prereqs
First, let's get the requirements out of the way.
Install Oracle's JDK6
Since Oracle, after they acquired Java from Sun, changed license agreement (not in a good way), Canonical no longer provides packages for Oracle's Java. Since we need oracle's version of java, we'll need to install it and set it to be the default JVM on our system.
We probably don't need Oracle's Java, but I had some weird problems while building Spark with OpenJDK - presumably due to the fact that open-jdk places jars in
/usr/share/java, I'm not really sure, but installation of oracle-java effectively solved all those problems, so I haven't investigated any further what exactly happened there.
Here's how:
# you may or may not want to remove open-jdk (not necessary):
sudo apt-get purge openjdk*

# to add PPA source repository to apt:
sudo add-apt-repository ppa:webupd8team/java

# to refresh the sources list:
sudo apt-get update

# to install JDK 6:
sudo apt-get install oracle-java6-installer
That should install java and make it default, all in one go.
If you check with:
cd /etc/alternatives
ls -lat
... you should see that java symlink points to JRE, that's inside our newly installed JDK:

If you see some other java version as default, you can fix that by executing either of these:
# to make oracle's jdk6 the default:
sudo apt-get install oracle-java6-set-default

# the other way of setting default java is:
sudo update-alternatives --config java

# are we good?
file `which java`
# should return:
# /usr/bin/java: symbolic link to `/etc/alternatives/java'

file /etc/alternatives/java
# should return:
# /etc/alternatives/java: symbolic link to `/usr/lib/jvm/java-6-oracle/jre/bin/java'
Check/set JAVA_HOME
For a good measure, I like to set JAVA_HOME explicitly (Spark checks for its existence).
# check where it currently points
echo $JAVA_HOME
# if you're doing this on a fresh machine
# and you just installed Java for the first time
# JAVA_HOME should not be set (you get an empty line when you echo it)

################## either set it system wide ####################
sudo echo "JAVA_HOME=/usr/lib/jvm/java-6-oracle" >> /etc/environment

# to reload
source /etc/environment

################## or only for the current user #################
echo "JAVA_HOME=/usr/lib/jvm/java-6-oracle/" >> ~/.pam_environment

# to reload
source ~/.pam_environment

#################################################################

# now try it out
echo $JAVA_HOME
.pam_environmentis the new.bashrc. What?Having problems with Java setup? Check the latest Ubuntu Java documentation.
Install Scala
- download 2.9.3 binaries for your OS from here (don't click the download link on top, scroll down to find
debdownload link, or simply use this direct download link) - the easiest way to install Scala from
debpackage is to simply double click on it, and let the Ubuntu Software Center take care of you
# to check whether the installation went well:
scala -version

# should spit out:
Scala code runner version 2.9.3 -- Copyright 2002-2011, LAMP/EPFL
Check/set SCALA_HOME
# I'll set SCALA_HOME only for my user sessions
# who knows, maybe my wife will like to use another version :)
echo "SCALA_HOME=/usr/share/java" >> ~/.pam_environment

# again, same as with java, to reload:
source ~/.pam_environment
Install Maven
Skip if you'll choose to install Spark from binaries (see the next section for more info) This one is dead simple:
sudo apt-get install maven
Be warned, a large download will take place.
It is flat out awful that a dependency & build management tool may become so bloated that it weighs 146MB, but that's a whole different story...
Install Spark
We'll try, like a couple of hoodlums, to build the cutting edge, development version of Spark ourselves. Screw binaries, right :)
If you were to say that this punk move will just complicate things, you wouldn't be far from truth. So, if you'd like to simplify things a bit, and avoid possible alpha-version bugs down the road, go ahead and download (and install) Spark binaries from here.
If, on the other hand, you're not scared, keep following instructions.
Just kidding.
No, honestly, I really suggest that you use binaries (and skip to OMG! section).
Back to the story, so my grandma was building Spark from source the other day and she noticed a couple of build errors...
- to get the Spark source code:
# clone the development repo:
git clone git://github.com/apache/incubator-spark.git

# rename the folder:
mv incubator-spark spark

# go into it:
cd spark
- we'll use Maven to build Spark:
But what these params bellow actually mean?
Spark will build against Hadoop 1.0.4 by default, so if you want to read from HDFS (optional), use your version of Hadoop. If not, choose any version.
For more options and additional details, take a look at the official instructions on building Spark with Maven.
# first, to avoid the notorious 'permgen' error
# increase the amount memory available to the JVM:
export MAVEN_OPTS="-Xmx1300M -XX:MaxPermSize=512M -XX:ReservedCodeCacheSize=512m"

# then trigger the build:
mvn -Phadoop2-yarn -Dhadoop.version=2.0.5-alpha -Dyarn.version=2.0.5-alpha -DskipTests clean package
If you did everything right, the build process should complete without a glitch, in about 15 to 30 minutes (downloads take the majority of that time), depending on your hardware. The only type of notifications should be Scala deprecation and duplicate class warnings, but both can be ignored.
You should see something like this by the end of the compilation process:
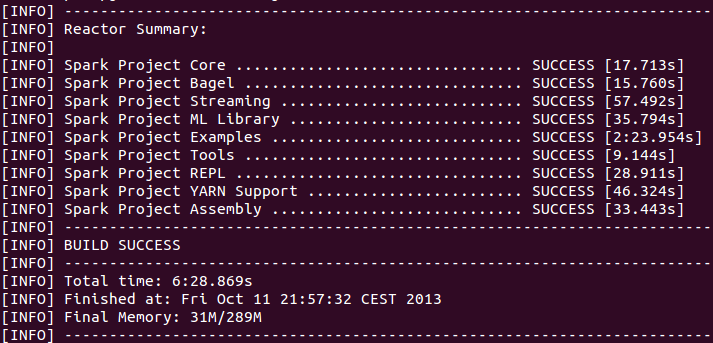
The above is from Ubuntu, with Core-i7-Quad 2.6GHz and 8GB of RAM.
And this is the same thing from Xubuntu, with Core-i5-Duo 3.2GHz and 4GB of RAM:
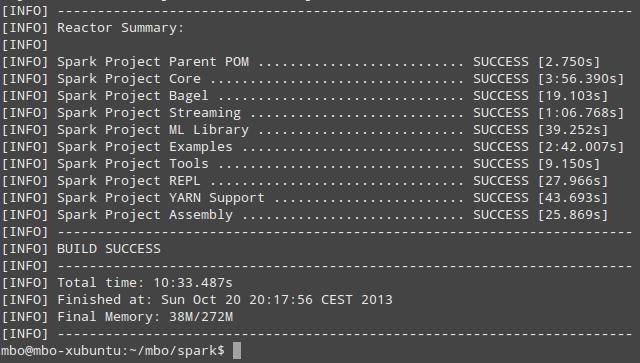
Since I have successfully built Spark with mvn I have never used sbt (Scala Build Tool) to build it, but that option is also available to you.
OMG! I have a running Spark in my home
... IN MY HOME, in my bedroom, where my wife sleeps! Where my children come to play with their toys. In my home.
Yes, that was my general feeling when I first connected to a Spark master with Scala repl:

How to get there
OK, we installed all the prerequisites and successfully built Spark. Now, it's finally time to have some fun with it.
To get the ball rolling, start the Spark master:
# to start the Spark master on your localhost:
./bin/start-master.sh

# outputs master's class and log file info:
starting org.apache.spark.deploy.master.Master, logging to /home/mbo/spark/bin/../
logs/spark-mbo-org.apache.spark.deploy.master.Master-1-mbo-ubuntu-vbox.out
If you need more info on how the startup process works, take a look here.
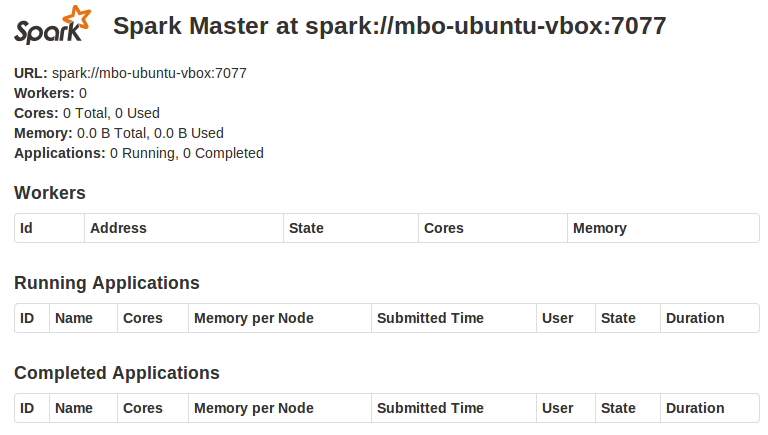
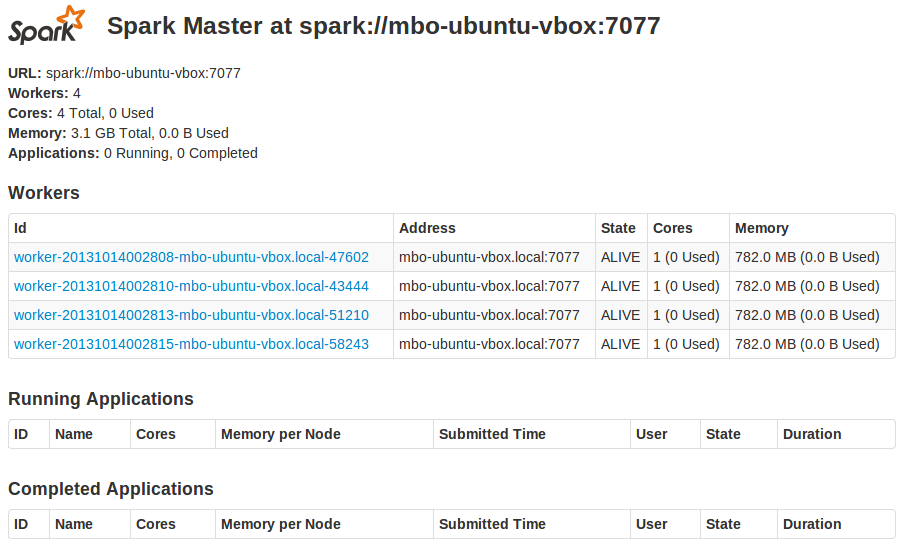
To check out master's web console, open http://localhost:8080/. Nice, ha?
Starting slave workers
Our beloved master is lonely, with no one to boss around. Let's fix that.
Spark master requires passwordless ssh login to its slaves, and since we're building a standalone Spark cluster, we'll need to facilitate localhost to localhost passwordless connection.
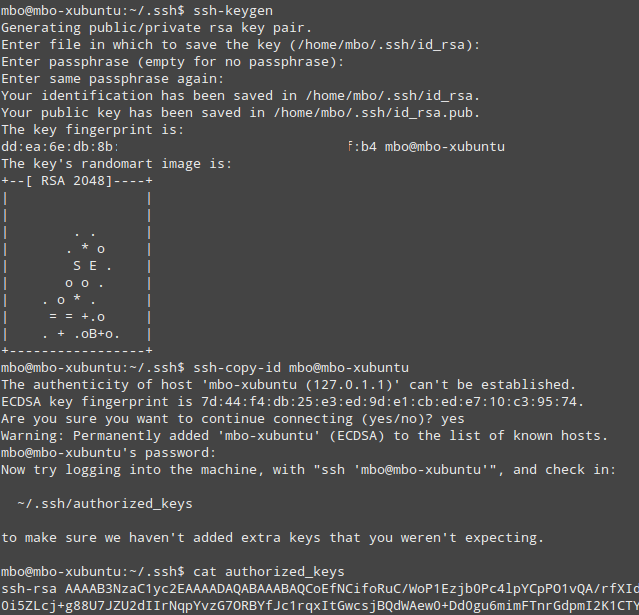
If your private key has a password, you'll need to generate a new key and copy its public part to ~/.ssh/authorized_keys:
# generate new public-private key pair:
ssh-keygen

# just press enter both times, when asked for password

# to add your key to authorized keys list on your machine:
ssh-copy-id mbo@mbo-xubuntu

# where 'mbo' is your username and 'mbo-xubuntu' is your localhost's name
# confirm by typing 'yes' and then enter your login password, when asked
That should look similar to this:
If you get stuck, follow these instructions, and these, if needed.
Be careful not to open a door for malicious intrusion attempts. If you're new to
ssh, here is a short and sweet intro to openssh.
If you don't have ssh server installed, you'll need to get one:
# to check whether the openssh server is installed
service ssh status

# if that returns "unrecognized service", then follow instructions:

# to install openssh-server (most Ubuntu versions come only with ssh client)
sudo apt-get install openssh-server

# then check whether the openssh server is up (should be automatically started)
service ssh status

# if not
service ssh start
Actually starting slave workers
To tell Spark to run 4 workers on each slave machine, we'll create a new config file:
# create spark-env.sh file using the provided template:
cp ./conf/spark-env.sh.template ./conf/spark-env.sh

# append a configuration param to the end of the file:
echo "export SPARK_WORKER_INSTANCES=4" >> ./conf/spark-env.sh
Now we've hopefully prepared everything to finally launch 4 slave workers, on the same machine where our master is already lurking around (slaves will be assigned random ports, both for repl and http access, thus avoiding port collision).
# to start slave workers:
./bin/start-slaves.sh
You should see something similar to this:

If you now refresh master's web console, you should see 4 slaves listed there:
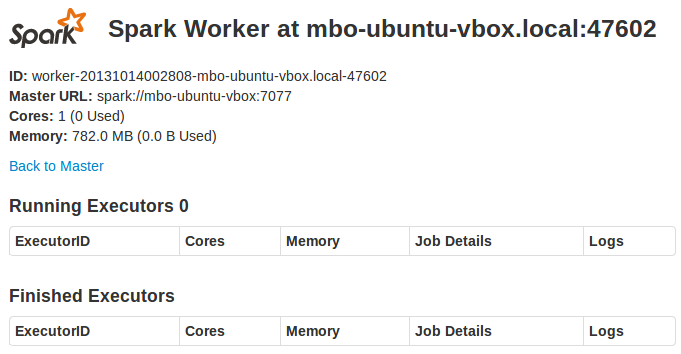
Clicking on a slave's link opens its web console:
Starting and stopping the whole cluster
Since you're going to start and stop master and slaves multiple times, let's quickly go through the simplified procedure of starting and stopping the whole cluster with one command:
# first, let's stop the master and all the slaves:
./bin/stop-all.sh

# then, to start all of them in one go:
./bin/start-all.sh
Configuring log4j
I regularly configure log4j to write to a log file, instead of a console.
If you'd like to set up the same thing yourself, you'll need to modify log4j.properties located in spark/conf/ directory. Something like this:
# Initialize root logger
log4j.rootLogger=INFO, FILE
# Set everything to be logged to the console
log4j.rootCategory=INFO, FILE

# Ignore messages below warning level from Jetty, because it's a bit verbose
log4j.logger.org.eclipse.jetty=WARN

# Set the appender named FILE to be a File appender
log4j.appender.FILE=org.apache.log4j.FileAppender

# Change the path to where you want the log file to reside
log4j.appender.FILE.File=/mbo/spark/logs/SparkOut.log

# Prettify output a bit
log4j.appender.FILE.layout=org.apache.log4j.PatternLayout
log4j.appender.FILE.layout.ConversionPattern=%d{yy/MM/dd HH:mm:ss} %p %c{1}: %m%n
To assure that Spark will be able to find log4j.properties, I suggest you create a new java-opts file in spark/conf/ directory and place this line inside (modify the path, of course):
-Dlog4j.configuration=file:///mbo/spark/conf/log4j.properties
FYI, the same thing can be accomplished using
SPARK_JAVA_OPTSparam inspark-env.sh.
Playing with Spark
We are finally ready for our first interactive session with Spark.
To launch Spark Scala repl:
# launch scala repl
MASTER=spark://localhost:7077 ./spark-shell
Hello Spark
As a demonstration, let's use our Spark cluster to approximate PI using MapReduce algorithm:
/* throwing darts and examining coordinates */
val NUM_SAMPLES = 100000
val count = spark.parallelize(1 to NUM_SAMPLES).map{i =>
  val x = Math.random * 2 - 1
  val y = Math.random * 2 - 1
  if (x * x + y * y < 1) 1.0 else 0.0
}.reduce(_ + _)

println("Pi is roughly " + 4 * count / NUM_SAMPLES)
The PI estimation algorithm is based on the fact that "throwing a dart" a large number of times (1M), each time striking randomly inside a unit square ((0, 0) to (1, 1)). We pick random points in the unit square ((0, 0) to (1,1)) and see how many fall in the unit circle. The fraction should be π / 4
If you're not comfortable with Scala, I recently wrote a Java developer's Scala cheat sheet (based on Programming in Scala SE book, by Martin Odersky, whose first edition is freely available online), which is basically a big reference card, where you can look up almost any Scala topic you come across.
Setting up Spark development environment in Eclipse
Most Spark developers use IntelliJ IDEA, but since I don't have enough will power to switch over, I'm still with Eclipse (for JVM-related stuff).
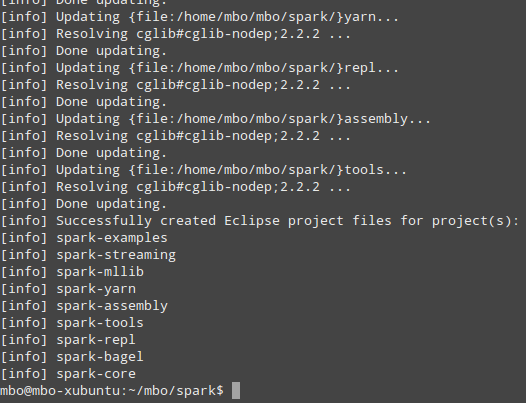
Luckily, all you need to do to prepare Spark for opening in Eclipse is run:
sbt/sbt eclipse
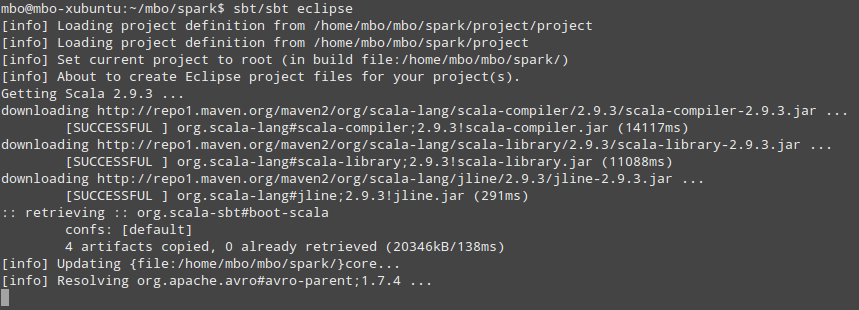
Which should hopefully finish like this:
What Spark uses under the hood?
Since you're still reading this, I'll go ahead and assume that you're like me. You don't want to just use something, you like to know what you're working with and how it all works together.
..
So let me present you with the list of software (all open source) that was installed automatically, alongside Spark:
My setup - post festum
- Hadoop 2.0.5-alpha (with Yarn)
- Zookeeper 3.4.5
- Avro 1.7.4
- Akka 2.0.5
- Lift-json 2.5
- Twitter Chill 2.9.3 (Kryo serialization for Scala)
- Jackson 2.1 (REST)
- Google Protobuf 2.4.1
- Scala-arm (Scala automatic resource management)
- Objenesis 1.2 (DI & serialization)
- Jetty 7.6.8
- ASM 4.0 (bytecode manipulation)
- Minlog & ReflectASM (bytecode helpers)
- FindBugs 1.3.9
- Guava (Google's Java general utils)
- ParaNamer 2.3 (Java method parameter names access)
- Netty 4.0
- Ning-compress-LZF 0.8.4 (LZF for Java)
- H2-LZF 1.0 (LinkedIn's LZF compression, used by Voldemort)
- Snappy-for-java 1.0.5
- Ganglia (cluster monitoring)
- Metrics 3.0 (collector for Ganglia)
- GMetric4j (collector for Ganglia)
- FastUtil 6.4.4 (improved Java collections)
- Jets3t 0.7.1 (Amazon S3 Java tools)
- RemoteTea 1.0.7 (ONC/RPC over TCP and UDP for Java)
- Xmlenc 0.52 (streaming XML in Java)
- Typesafe config 0.3.1 (JVM config files tools)
- Dough Lea's concurrent (advanced util.concurrent)
- Colt 1.2.0 (math/stat/analysis lib used at Cern)
- Apache Commons, Velocity, Log4j, Slf4j
Interesting topics to cover:
Spark family:
- Mesos
- Bagel (graph computations)
- MLlib (machine learning)
- Streaming
Spark integration with: